
Tomatoes are one of the most popular vegetables. They come in a variety of colors, sizes, shapes, and flavors. Tomatoes can be eaten raw or cooked and are an excellent addition to many recipes. Growing tomatoes can sometimes be a little challenging. This tomato growing guide will answer all your tomato growing questions and more.
Starting Your Tomatoes
The seed starting process is the most exciting kick-off to the gardening season. Watching your seedlings grow into sturdy, colorful, tasty plants can be fascinating. Scheduling tomato seeding, starting the process correctly, and proper growing on maintenance is important to your tomato seed growing success.
Seeding
To determine the best time for seeding tomatoes, count back 6 to 8 weeks before the last average spring frost in your area. You can consult your local county extension service if you’re not sure what the last frost date average is. Accurate timing of your tomato seeding will allow the best success with your tomato seedlings, so plan your schedule carefully.
Tomato seedlings started too early can cause a gardener extra stress and effort to keep seedlings happy and healthy indoors longer, until they can be planted out. On the other hand, tomato seedlings started too late will delay your tomato harvest. Depending on the variety, one early frost can damage fruits before you get to harvest any.
The savvy gardener will stagger sowing of their tomato seeds two to three weeks apart. Staggered tomato seeding will give you several sizes of tomato plants for a staggered tomato planting and therefore, a slightly staggered tomato harvest as well. It takes approximately 7 to 14 days at a temperature of 70° to 80° F for germination.

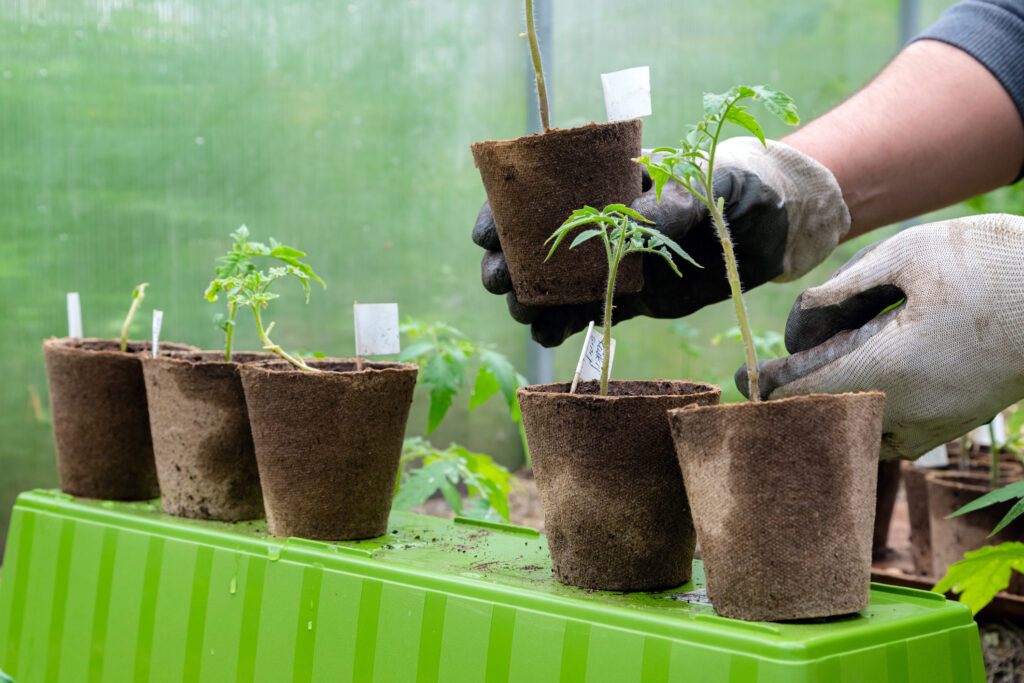
When you are ready to seed your tomatoes, fill cell packs, seed trays, peat pots, plastic pots, or clay pots with a good, sterilized seed starting mix or soilless mix. Pre-moistening the mix is suggested. You can then fill and firm it gently into the pots or trays without packing it too tightly. You may want to soak your seeds in warm water for 25 to 30 minutes while you are preparing their seedbed. Using a dibble (pointed stick or pencil), make a hole in the center of the potting mix approximately ¼” deep, drop in two to three tomato seeds, and refill the hole. If you are sowing in market packs or flats, sow tomato seeds sparingly in rows or scatter the tomato seeds thinly across the soil surface. Cover the tomato growing area with ¼” of seed starting mix or vermiculite and firm lightly. Be sure to accurately mark your tomato containers with tomato variety names and tomato sowing dates.
Water your tomatoes thoroughly with a fine spray or wet soil from the bottom, allowing water to absorb until the surface is moist. After sowing, keep your tomato containers moist but not wet and in a warm place (70°-80°) until seeds germinate. To speed the germination process, apply bottom heat with a heating pad or sit the flats on top of a water heater. Check your tomato seedlings often so the tomato seedlings can be moved to full light as soon as they emerge.
Growing On
As soon as your tomato seedlings emerge be sure to locate them in the sunniest spot available. You can also use grow lights, positioning your tomato plants 4” to 8” below the light source, and lighting your tomato plants 12 to 18 hours per day, just not at night. Temperatures of 60° to 70° F are best to grow tomato seedlings, which are slightly cooler than what they need to germinate. Keep the soil surface moist for your tomato plants and provide for good air circulation.
If you are growing tomato plants in market packs or flats, young tomato seedlings are ready for transplanting to individual pots when they develop their first pair of true leaves. Thin your plantings down to the strongest single tomato seedling by pinching off weaker tomato seedlings at the soil level.
A tiny tomato seed only has enough stored energy to produce a small root and the first couple sets of small leaves. After they spend this energy, it is not uncommon for seedling growth to stall and sometimes ever look pale in color. To avoid this, as soon as the cotyledons appear you can fertilize them with a good balanced 10-10-10 or 6-6-6 water-soluble plant food, like ALGO Plus All-Purpose plant food. Fertilize at 1/3 to 1/2 of recommended product label strength.

Hardening Off
Approximately 7 to 10 days prior to tomato transplanting tomatoes to the garden, begin acclimating your tomato plants to outside conditions. You can utilize a sheltered location such as a cold frame or screened-in porch to protect your tomatoes from wind and sun at first. Then gradually accustom your tomatoes to tomato garden conditions as the weather permits. Hardening off strengthens the tomato plant cell structure and will result in much sturdier and more rapidly growing tomato plants after transplanting to the tomato garden.
Transplanting Tomatoes
Proper site preparation and transplanting can sometimes be difficult. It is important that the site your tomatoes will be transplanted to be well prepared so your tomatoes can thrive once moved. Transplanting should be done carefully and thoroughly.
Site Preparation
Your tomatoes are ready for transplanting to a prepared site in the tomato garden as soon as all danger of frost has passed. Tomatoes thrive in any reasonably good, well-drained garden soil receiving full sun. You should test the soil in the fall if possible, so there is adequate time to amend the soil as recommended. The pH should be adjusted to within the range of 5.5 to 6.5. The fall is also a good time for deep spading or tilling to a depth of 8” to 12”, and the soil should be enriched by adding compost, leaf mold, or peat moss as needed.
When early spring arrives, till or spade the surface again, and rake to break up clods and remove stones. Fertilize your soil as recommended on your soil test results form. Manure should be used very cautiously if even at all because excessive nitrogen tends to cause tomato plants to produce an overabundance of foliage rather than fruit. It is more beneficial to use a vegetable-specific fertilizer, such as Dave Thompson’s® Healthy Grow Tomato food with a 3-3-6 formulation with important trace elements. The addition of organic matter like a leaf or mushroom compost, as a side dressing at 14-21 day intervals during the tomato growing season is also beneficial. If plants are slow to take off, another application of the tomato fertilizer may be necessary.
In larger tomato plantings, rows of staked tomatoes should be 30” to 42” apart and plant spacings in the row at 24” to 30”. When tomatoes cannot be staked, row spacing of 6 ft. and tomato plant spacing of 4 ft. in the row are needed for adequate air movement and tomato plant development. Staking is generally the preferred method of growing tomatoes where space is limited. Staked tomatoes tend to yield a much higher proportion of clean and undamaged fruits. Wooden stakes or wire cages are good supports for tomato plants. Tomato supports should be 40” to 72” tall, using the shorter for “determinate” tomato varieties and the taller for the “indeterminate” tomato varieties.
“Determinate” tomato varieties, also known as “bush” tomato varieties, such as Bush Early Girl Hybrid, are those that reach a certain tomato plant height and then stop growing. Most of the fruit is borne over a 4 to 6 week period. “Indeterminate” tomato varieties, like the ever so popular Big Beef Hybrid, continue to grow and flower throughout the tomato gardening season. These tomato plants have fewer mature fruits at any one time but keep producing. “Indeterminate Short Internode (ISI)” tomato varieties, like Celebrity Hybrid, combine the controlled tomato growth habit of a “determinate” tomato variety with the unlimited tomato production potential of an “indeterminate” tomato variety. These are most commonly referred to as or listed as “Semi-determinate”.
Transplanting Tomatoes
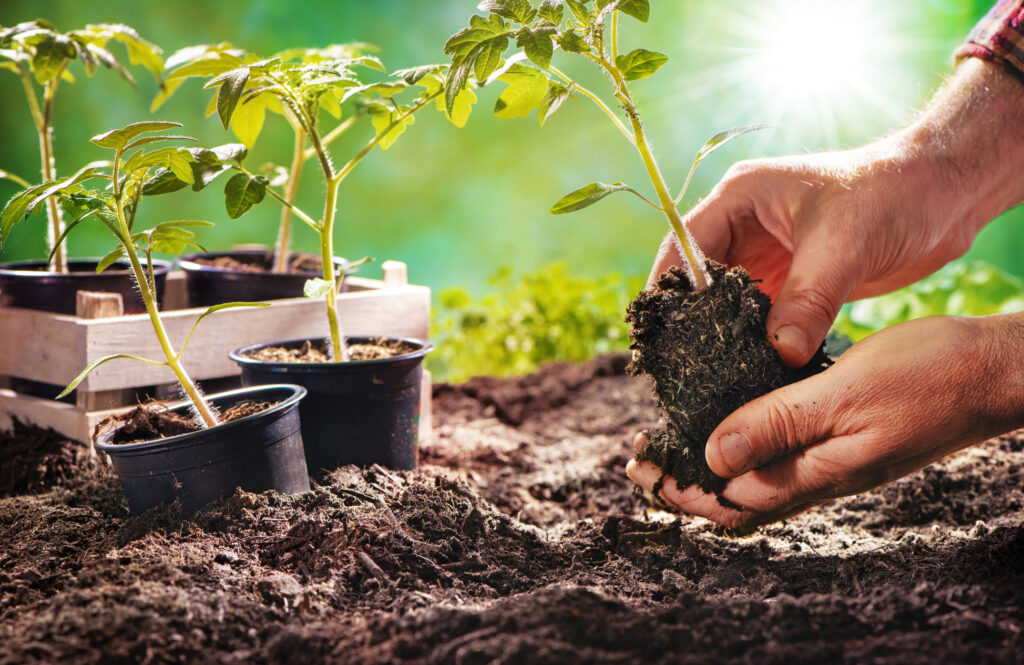
When you are transplanting hardened off tomato plants to the tomato garden, try to choose a cloudy, wind-free day or plant the tomatoes in the late afternoon. Whether the danger of frost has passed or not is up to you to judge. Emergency protection devices, such as plastic jugs with the bottoms removed or our “Kozy Coats” plant protectors, can help if a late frost occurs. Place the plant protector over your tomato plants the evening before a frost is predicted, being careful not to let foliage touch the plastic. Then remove the plant protector the next morning after the sun has been up for at least an hour.
Water your tomato plants thoroughly, approximately a half-hour prior to planting. Always make sure the holes are large enough to accommodate all the tomato roots without crowding. Your tomato plants should be set in deeper than they were originally in the tomato containers. Tomato plants may be planted down to the first leaves because they root freely from any portion of the tomato stems buried beneath the soil. Even if some of your tomato plants have become leggy, dig out furrows and lay the tomato plants horizontally, burying any excessively tall stems. The exception to this rule is with “grafted” tomato plants. The graft should remain 1 to 2 inches above the natural soil grade. Partially fill the hole with soil to within approximately 3” of the surface, water thoroughly, being careful to settle soil around roots, eliminating air pockets. Finish filling the hole with additional necessary soil and firm the soil around the tomato stem.
Keeping Your Tomato Garden Healthy
Proper culture, deterring predators and pests, and preservation are crucial to the success of your tomato growth. It is necessary to continually watch what is happening and maintain your tomato garden throughout the tomato growing season. Keeping your tomato garden healthy and disease-free ensures your tomato plants are the best they can be.
Tomato Culture
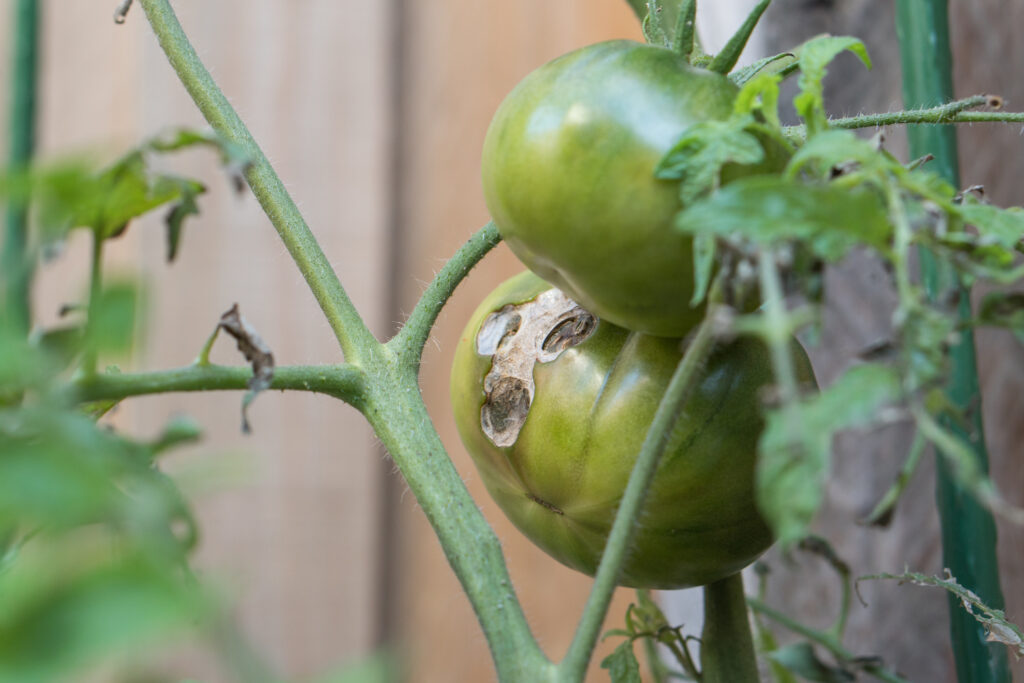
Keeping your tomato plants consistently well-watered during the growing season, especially in periods of drought, will help ensure better yields. Consistent watering also helps control tomato problems such as Blossom End-Rot, which is a blackening of the fruit on the blossom end due to a calcium deficiency often related to water uptake.
Proper soil nutrition is critically important in keeping tomato plants healthy and productive. If you followed the appropriate steps to prepare the garden soil early in the spring your plants will perform well. If issues like blossom end rot appear, don’t despair and consider the season a failure. This condition, like many others, is only temporary, affecting plants primarily in the early part of the season. Learn from it, remove any damaged fruits, and consider the additional application of a good tomato-specific fertilizer that is high in calcium like Tomato Maker™ 4-2-6 with calcium.
Weeds compete with tomato plants for water, food, and space. It is extremely important to control weeds when it comes to growing tomatoes. Keep tomato soil cultivated to approximately a 1” depth or remove all established weeds and use a liberal application of mulch to prevent new weeds from emerging. Mulch materials, such as clean straw or plastic film, also help conserve moisture, help protect the fruits from rot and blight tomato diseases, and help maintain consistent soil temperatures.
The use of Red Mulch Film for growing tomatoes, a bright red, thin plastic, is popular for boosting tomato crops. In addition to warming the soil and helping retain moisture, it also reflects far-red wavelengths up into the plant to stimulate plant development. Results from this type of red mulch are earlier and increased yields. Using drip irrigation or soaker hoses is beneficial when using any plastic film to ensure plants have the water they need.

Growing tomatoes using Red Tomato Trays is another alternative. Place them around your plant when transplanting your tomato starts in the garden. As mentioned, their red color stimulates plant growth, and the trays also protect against cutworms, suppress weeds, and also helps retain soil moisture, thus helping to prevent blossom end rot.
Tomato plants grown on stakes or trellises will need to be tied at regular intervals throughout the summer. Use soft string, tomato clips, strips of old sheeting, or other soft, stretchable materials and be sure you do not tie the tomato stems so tightly that they are strangled as the stems grow and thicken.
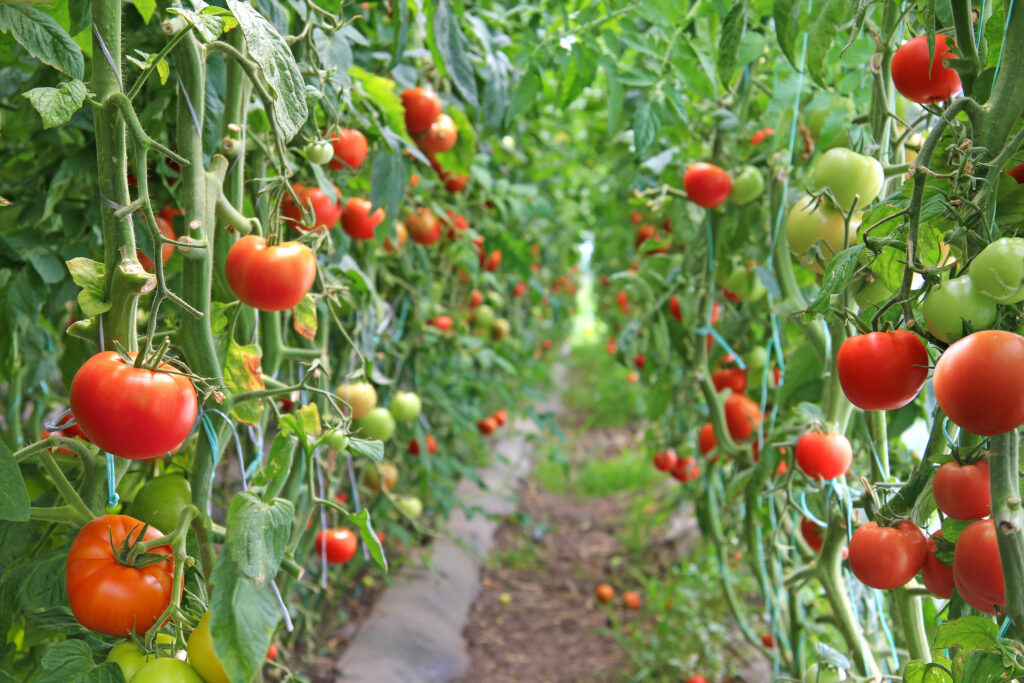
Tomato ripening time varies with location and tomato growing season and is influenced by soil and weather conditions. The days to tomato plant maturity give you the approximate number of days from tomato transplanting until the first fruits should ripen. Leave the fruits on the vine until the tomatoes become completely ripe for the best flavor and food value. When tomato plants reach their full color, they are ready for picking. Be sure to pull the tomatoes off gently to prevent bruising.
Once picked, tomatoes should be stored in a cool dark place (but NOT in the refrigerator). In hot, humid weather, tomato fruits will be firmer if they are picked slightly before they are fully ripe and allowed to ripen indoors. All green tomatoes should be picked at the end of the tomato season, before the first hard frost. You can use the greenest tomatoes for pickling or frying. Tomatoes of ripening size can be stored in shallow boxes or trays in a cool but frost-proof area where they will ripen gradually. These will provide usable tomatoes, however not vine-ripened tomato quality.
Tomato Plant Diseases & Pests
Tomatoes tend to be attractive to many worms, beetles, diseases, and other pests. It is crucial to keep a very close eye on what is happening throughout the tomato growing season.
Damaged or stripped tomato foliage is almost a sure sign of tomato hornworms, and holes bored into fruits mean tomato fruit worms have hatched. If you see blotched and yellow tomato foliage, this might mean blights are present. Stunted tomato plants could mean the invasion of nematodes, which are most common in southern U.S. soil.
“Lifting” tomato plant foliage, meaning to remove all the lowest leaves so none of the foliage is close to the ground, is a very helpful and easy task to help prevent many common fungal diseases. Also spacing plants out appropriately, with at least 12 inches between plants at full-grown size is a good deterrent to spreading diseases.
Organic tomato gardeners often choose to handpick these uninvited guests. You can use insecticidal soaps or pyrethrins as treatments in combination with natural predators. Some tomato gardeners, especially those with larger tomato plantings, may need chemical pesticides for the control of various insects and diseases. Make sure the pesticides you use are specifically labeled for your tomato crop and pests and follow the label directions thoroughly. The more modern hybrid tomato varieties have in-bred disease resistance.
From seeding to pest control we can help you succeed! Jung Seed has a wide variety of tomatoes and all the supplies you need to grow healthy plants.
Other Recommended Reading

- How To Prevent Yellow Shoulder On Tomatoes
- Easy To Grow Salsa Garden
- Understanding Heirloom & Hybrid Varieties
- Container Gardening For Beginners
- Companion Planting Guide
At Jung Seed Co, we strive to be your go-to guide for all your gardening needs. Our YouTube channel The Garden Doctor by Dick Zondag is where he provides gardening tips for all levels of gardeners. When you need reliable gardening advice, turn to the trusted experts at Jung.
View our new catalog online or browse our website for your gardening favorites. To receive info on new products, exclusive deals, and specials, be sure to sign up for our weekly email. Join our Facebook page, to discuss all things gardening!